Thursday, March 26, 2015

Greenhouse

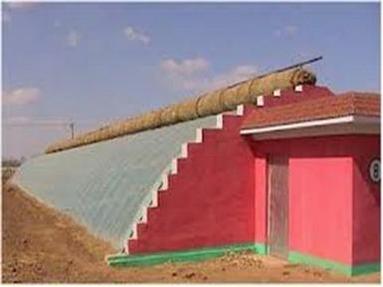
Over the last five weeks we’ve made steady progress on the greenhouse. The big catalyst was the builders showing up one morning to get the greenhouse plastic on. Never mind that we had 12 m.p.h winds and it was really cold….we got it done anyway. With six of us hanging on for dear life, in windy conditions, it didn’t take more than an hour to get the double poly on using the wiggle wire system. That is a super slick way to install the plastic and there’s still room in the track if we want to put some shade cloth on the greenhouse this summer. We initially left about 12” of excess plastic around the edges in case we want to tighten up the plastic at some point. Since we’ve been working in less than ideal conditions, we haven’t had the luxury of working on a warm day to get things exactly the way we want them as far as getting all the slack out of the plastic. It may just be me seeking perfection, whatever that might be. We did trim the excess plastic on the west wall recently because that is where all the wind comes from and it was stressing this flap of plastic like crazy to have it flapping frantically in the wind (let alone driving me crazy listening to it).

Once the plastic went on, I was able to paint the interior on sunny days. Within an hour or two of direct sunlight hitting the greenhouse, the temps would be in t-shirt zones and I could paint. Two coats of Benjamin Moore latex enamel Moor-Glo were put on everything. After that was done, the electricians showed up to get the receptacles installed that would run the water and air pump, fish tank heaters and inflation fan for the greenhouse roof.  Since there are two layers of plastic, an inflation fan is needed to inflate the space between the two layers. You’d be amazed at the amount of insulation that this creates. The other day when we unplugged the fan to get some of the slack out of the plastic and re-do one of the wiggle wires, the roof was still inflated. It was a cold but sunny day and the warm air stays trapped between the two layers. Even when I took a 3” piece of PVC conduit and plunked it on the roof, it wouldn’t deflate…it was insane.

In four days the electricians had the receptacles and lights installed. I found used 350 watt metal halide lights on Craigs list for $35/each. These are low bay warehouse lights and are typically used in ceiling heights of 10-15’. They also make a high bay light that works with taller ceilings. Metal halide lights give off light that is in the growing/blossoming spectrum and are excellent “grow” lights. They can have either an aluminum or acrylic shade on them or in this case they have the safety tempered glass style of cover with cage around them. I picked this type of light because they also give off a little heat when they are on and the only time I want to use these lights is during the gloomy winter months when plants won’t have enough light to grow. In our aquaponic training, Tim had given us a great article on choosing lights (if you decide to get them), how to size them for your trough size and how much they cost to buy and operate. On Thursday they had hung the 16 lights I bought and were set to finish wiring them on Friday morning. I pulled out the article Tim wrote and ran the calculation again (had done it early on in the planning process of building to know it was a viable option for us) and about had a heart attack. By my calculations, it would be an astronomical cost to operate them. When I met with the electrician Friday morning I discussed my concern and he took all the lights (except for two) down before his brother, the owner of the company arrived at the job site. When he got there he re-ran the numbers and we discovered that instead of using .0641 x kilowatts, I used the number as it is shown on the electric bill 6.41 cents. Let me tell you it makes a huge difference in the final number that you come up with.  Before I go over how you calculate it, let me say here that I had started looking at fluorescent fixtures as a back-up to these but at $250/ea for new ones (hadn’t gotten to the point of trying to find used ones), it didn’t make financial sense for us with the amount we would need. My electricians recommend using T-5’s if you want to get fluorescents because T-8’s and T-12’s are being phased out. LED’s are still too rich for most people’s wallets even though they are an awesome light for growing. The metal halide made sense for us for the heat benefit (remember it reaches –25 here on a regular basis in the winter) and for the excellent grow spectrum plus they cost less than $600 for 16 lights. So to figure out what your cost would be to configure your lights or run anything, here’s the calculation:

1) Add up your total wattage. (In our case 350 watts x 16 lights = 5600 watts)

2) Divide that number by 1000 to give you number of kilowatts. (5600/1000=5.6)

3) Multiply that number by the amount your electric company charges per kilowatt hour (here’s where I goofed up…5.6 x .0641=.3589 or 36 cents an hour

4) Multiply that number by the number of hours you expect to use them per day. (let’s say we use them 12 hours on cloudy days so 12 x .36 = $4.31

5) Multiply that number by the number of days in the month that you’d use them. (say 20 days are crappy each winter month so 20 x $4.31 = $86.15. That would be your lighting cost each month in the winter to keep your veggies growing. Even at 12 hours a day x 30 days a month, you’re only talking around $129….that number is way better than the one I came up with and one that I can live with.

Ok, moving on…electrical is done. Painting done. I installed insect screen over the vent openings. Next is the building of the troughs that the plants grow in. Since the building is super insulated, I don’t have to allow for rigid foam insulation in the sides of the troughs, only on the bottom. So instead of the trough sides being 12” tall , they need to be 14” high (allowing for the 2” foam sheet that will lay in the bottom of each trough). This will insulate the water in the trough from the cooler ground temps. Since I’m using 14” pieces you get some waste off each 4’ x 8’ sheet of plywood or hardie board. I found six pieces of 14” x 8’ pieces of exterior plywood in the lumber pile (how lucky was that ). They must have been trim pieces from something but that built one row of troughs (when your row is up against a wall, you only need one “side”) I have built all of the sides and am now finishing up the ends of the troughs. Since one row of troughs goes from wall to wall, I don’t need any end panels there. Only for shorter rows of troughs. Next will be the assembly of the troughs and installation of the liner, then the plumbing. We will have 116 linear feet of troughs or 464 sq feet of trough space (each trough is 4’ wide). We also want to have a 4’ x 40’ trough outside the greenhouse that will operate in the summer time for the heavy, sprawling plants like summer & winter squash, tomatoes, cucumbers, and pumpkins. This trough will be drained in the winter and covered to keep leaves out of it.

Before I can proceed with putting the troughs together, we have to get somewater runoff near greenhouse drainage issues resolved.  The excavator did not make it so the greenhouse and barn would be higher than the surrounding ground so consequently when it rains, a stream runs under the greenhouse floor. Thank goodness that we have the geo-fabric on the floor of the greenhouse because that suspends the floor over the water. It’s when you pull up the side of the flooring that you see the 008little stream running to who knows where. Not happy! He needs to extend the ditch along the back to take water away from the buildings and also push some of the dirt down and away from the buildings. If a swale is dug at the top of the bank behind the barn, that will capture most of the water and it can thenwater runoff behind barn be used to slow soak a berm planted directly in front of it. I want to plant rows of berry bushes the length of this bank and wind the swales down the side to keep all the berries well watered. All that we need now is some warm weather so the ground thaws so we can get this digging done. The ground is still really frozen.

While winter drags its’ feet, I am trying to get as many little projects done around the farm as I can. Things are taking shape and I’m trying to exercise patience. I keep telling myself that I’m way ahead of schedule. Originally I wouldn’t have been home until May to get anything done so I am way ahead of the game but I still feel the sense of urgency and excitement to get things growing. We’ve got 20 organic blueberry bushes and potatoes arriving in April. We just need Mother Nature to cooperate by sending us some warmer weather. I won’t be greedy….just give me something in the 50 degree range. I’ll take that at this point.

Friday, February 20, 2015

Time For Tappin’

Yesterday I went into the woods with my brother to help him tap an area he calls, “the gully”. It will soon be maple syrup time and once winter loses its’ grip on this area, the sap in the maple trees will start to flow. The gully is a little bit treacherous because there is a frozen stream bed running through it and the banks are steep with lots of rocks and barbed wire (this area used to be part of a fenced in cow pasture). With snow drifts and icy patches of snow, it makes for some slippery navigating to get to a lot of the trees that Jim has tapped here.

I was in charge of cutting off the old tap and putting the new tap on. This is thetapping tool special tool that is used to do that with. The yellow area is cutting off old tapthe knife that cuts the old tap off. You cut the old tap off the tubing and put it in your pocket, to discard later.

The tubing is threaded through the round red part of the tool and the new tap is positioned between the claw on the left and the open end of the tube. As you apply pressure with the tool, it pushes the new tap into the tube. It’s a little tricky to get the hang of. It’s some pretty heavy duty hand dexterity action going on….reminds me of the first time I had to flip donuts in the fryer, after dropping them out of the donut machine. Sort of like Lucy on the conveyor belt with all those chocolate candies coming at her. After doing about 25 taps I got the hang of it.

new tap

Here’s a new tap. It’s hard to see but there is a little black ball in the top tube, which is a check valve to prevent old sap from going from the line back into the tree. These little taps cost .60/piece and we wonder why maple syrup is pricey. The tool I was using is over a $100 to purchase!That’s a lot of investment that maple syrup producers have into their product. On top of that all the tubing, pumps, vacuums, reverse osmosis machines, evaporators, etc. that are part of the process.

We had 177 taps to change out in the gully and it took us about three hours to do it, due to the dangerous terrain that we had to navigate. It sure was a pretty day to be out and the gully provided some protection from the cold wind that was blowing. We saw a flock of turkeys and lots of animal tracks in the woods. I love to work outside if I have the proper amount of warm clothes to keep me comfortable. Luckily I had brought along my alpaca ski mask that helped to protect my face and neck from the bitter wind. We had to replace one drop line (the tubing that goes from a tap to the main line) because deer had gnawed on it. deer damageMy brother thinks that the deer (probably the fawns) like to chew on it due to the rubbery feeling. (Maybe it gives them relief when they are teething.) Here’s a picture of all the chew marks. Weird, huh. Jim says that deer and bear can really do a lot of damage to the lines. deer damage 2Once he hooks up his vacuum pump to a line, he monitors the pressure in the lines. If it isn’t as high as it should be, he comes out and walks the lines to see where there might be a puncture, like from chew marks, so that he can replace the tubing and get the pressure back to where it needs to be. Lots of trips into the woods to keep that sap flowing. Once you put a new tap on, then you drill a hole in the tree and use a hammer to put the tap in the hole. Once the weather warms up, the sap will start flowing and then the real fun begins.

It’s brutally cold outside today, with wind chills of –25. The weather has been extremely abnormal but who’s to say that it’s not the new normal. new loomI got out the new loom that I bought a while ago and have been trying to get reacquainted with weaving. I learned how to weave when I was doing my internship last winter at White Violet Center for Eco-Justice in Terra Haute, IN. I find that weaving is something to take my mind off how slow the day passes and it’sWeaving something to keep me occupied till spring gets here. I have lots of yarn and time to get involved in a fun project.

Tonight I’m heading out to join the members of the Mansfield Grower’s Market for their kick-off potluck. It will be fun to meet other farmers and growers from the area. My daughter is visiting for the weekend and is going along with me. It should be a good time.


Friday, February 13, 2015

Almost There


The builder and his crew worked yesterday. The good news is they got the last of the steel on and the solar fans installed. One screen door has been hung (two more to go) and downspout for one side of the roof has been completed. The bad news is that they still have two more screen doors to put on, one more downspout and the double poly for the roof. They will wait till we have a “calm” morning with very little to no wind to come back and finish. A warmish day would be nice but last night we slipped into the icy abyss of another polar vortex that is going to last through the weekend. The wind chills today are in the –25 range, which is dang cold. The kind of cold that makes your nose hairs tingle when you go outside. Thank goodness for the alpaca ski mask and gloves I bought at White Violet Center, during my internship last year, that got me through Indiana’s polar vortex. Nothing like alpaca fleece to keep you warm and dry, without the bulk.
The inside of the barn looks like a construction zone, due to the builders using it for material prep and a place to go to get warm. Anxious to get the greenhouse painting done so that I can build the troughs, etc. but nothing can happen till the plastic goes on and the space warms up. So we wait…

Friday, February 6, 2015

Winter Doldrums

We left the mud in December to plunge head-long into snow and bitter cold temps. The builders haven’t gotten everything wrapped up because one of the last crucial things to do is put up the double poly roof on the greenhouse. Ideally , it would be nice to have no wind (nothing like fighting a 25’ x 55’ long “kite” when it comes time to put the plastic on) and a day that isn’t freezing cold. We have not managed to have these two characteristics intersect so they can finish up. They did get the steel on the west and east walls. 004
There’s a strip that needs steel on the shared wall between greenhouse and the barn (see the silver area on right wall of barn). The builder was hoping for a good day next week to finish up but the weather is looking like another storm is going to come through on Monday.
When the cold weather came (and didn’t leave), each snowfall kept adding to the previous one because the ground was cold. We currently have about 8” on the ground but the wind has created some snow drifts that are up to my knees in the yard. We have a micro climate in this spot that produces extreme cold temps (last night it was –21) that are far colder than surrounding areas. The local weather station reported that for most areas around here, it was –5 degrees. The extreme temps will be a challenge for winter growing and a test to see how well the growing troughs can maintain their temps. A fellow aquaponic grower near here, who uses the same type of growing system, only loses 2 degrees of warmth over the entire length of the system. This is due to the trough sides and bottom being insulated to maintain the water temps. On top of that, the raft that the plants are growing in is a 2” piece of Dow insulated board. Insulation all the way around to keep the water temps consistently warm and that keeps the plants happy.
I placed orders for some of the organic items that the seed companies tend to run out of early, potatoes and garlic. The potatoes won’t ship till after April and the garlic doesn’t get shipped till fall but this way I know it’s ordered and I’ll get some. Not much I can do till the greenhouse is completed. I’ve been working on the paperwork for the organic certification. My brother is starting to tap trees and I hope to help him out with boiling this year and learn about the whole process. Can you believe, that in another week, February will be half over already. You know what that means….Spring is just around the corner!

Tuesday, December 30, 2014

Playing Catch Up–Barn Construction

I can’t believe that it’s’ been almost 4 weeks since I last posted to the blog.

Building during the Christmas holiday threw some delivery set-backs into the mix that we hadn’t counted on. As of right now, the barn is about 98% done. The builders have to put up the gutter on the left side and the metal above the greenhouse on the shared wall (where the greenhouse connects to the side of the barn). We put up the last of the insulated panels on the inside but have to finish insulating the ceiling next spring (after the electrician finishes his work).

The electrician was delayed in finishing the job because the builder had not put the metal on the barn yet and he needed the metal in order to mount his electrical boxes to it. I’m not sure if it’s typical of all contractors to promise you a certain completion date and then they don’t hit it…again and again and again. It was very frustrating. The builder felt sure he’d be done by Christmas…now it’s looking like it will be January 9th for everything to be finished.

Our Amish builder built the wooden barn doors for us and we love them. Come spring we’ll get a coat of paint on them. All of the electrical is done for the barn. Before he put the breaker box inside the barn, we had already made the decision to go from a 100 amp service to a 200 amp service. Due to some of the amperages of current and future items we want, it only made sense to do it now before the whole thing was installed. What that did affect though was getting an excavator to come back out and dig another trench from the pole to the barn. I think the increase in cost was minimal in comparison  to having it done down the road, when everything would have to be changed out. I knew the breaker boxes are a different size (when going from 100 amp to 200 amp) but boy, have the 200 amp boxes gotten large. Everything goes up in size…the mast head at the top of the electric pole, the wire size coming in from the pole (it almost triples in size), and a different meter on the pole. It will be worth it to have the capability to add more circuits and be able to expand our business.

Greenhouse Construction:

The greenhouse construction has progressed very quickly, once the rafters were completed by the builder. He encountered some problems getting his workshop warm enough to cure the epoxy but once he got all of that worked out, he built the rafters in about a week. A week-long visit from family delayed them getting back to work so the original completion date of Christmas came and went.

The rafters are a unique aspect of the greenhouse. They need to be arched so that the gentle wrap of the poly plastic over the frame will not allow the plastic to flap in the wind and stress the plastic. Our rafters (and the whole design of the greenhouse) came from plans we purchased from Friendly Aquaponics .

This greenhouse is designed after Chinese-style greenhouses that were constructed thousands of years ago.

The important components that make this style of greenhouse so different from typical greenhouses is that three of the walls are insulated (north, east and west walls). On the Chinese style greenhouse shown above you can see the rolled mat on the roof, which is a thermal blanket that is rolled down over the face of the greenhouse at night to keep the heat in.

For our greenhouse we decided to use SIP’s (structural insulated panels) that we had left from insulating the barn and we used those to insulate the walls of the greenhouse. Between the Prodex and SIP’s we have an R-value of R-37 in the east, west and north walls of the greenhouse. There are no fossil fuel heating sources used in the greenhouse. Since our growing takes place in troughs, filled with water, we have a tremendous amount of thermal mass that will be in the greenhouse. Contrary to common growing practices in greenhouses, the important element is the water temperature, rather than the air temperature. The water in the tank that will house the fish will kept at a constant 72 degrees and this water will circulate through the troughs, where the veggies will be growing. Maintaining that 72 degrees temperature in the troughs is crucial. We insulated the floor of the greenhouse with Prodex, which will help us maintain and hold that temperature in the trough. We’ve also put Prodex around the tank that will hold the fish. I purchased two 300 gallon IBC totes. You have to be really careful where you get totes because you don’t want to buy something that had toxic chemicals stored in them or you’re fish won’t be around for long.Becky & fish tank

We had to have an excavator come in to put some fill inside the greenhouse to bring the floor up to where it should be. There was almost a 10” difference in drop from the front of the building to the back. Since our buildings are sitting at the base of a hillside, it made for a challenging site orientation for the buildings. Gravel was put in first and then 4” of sand on top. Today we put down the organic diatomaceous earth and citric acid, before putting down the layers of plastic and weed mat. The citric acid is a natural weed killer and the diatomaceous earth will kill any ants if they should try to come up under the greenhouse. When the troughs are built and the form stakes are driven into the ground, the DE will go with it and provide pest protection around these penetrations. On top of the DE and citric acid we put 6 mil black construction plastic, then a layer of Prodex and then geotextile fabric. All of these layers should provide a weed free, bug free (at least from creepy crawly things coming under the greenhouse) and insulated greenhouse.

At the end of the week, the plastic will go on, using wiggle wires and track (more on that next time). The metal has to go up on the ends of the greenhouse, a door installed on each end, solar fans mounted and gutter put on the barn. Friday should see most of this task list completed. The metal will have to wait a week since it won’t come in till next week. Sad for us because we have to leave on Sunday to go to Texas for a few months to complete some work assignments. Once we get back I will start building the troughs, the electrician will come back to put receptacles in the greenhouse and we’ll get veggies started. It’s been a super busy couple of months, stressful at times, but we can see the light at the end of the tunnel. Good times ahead…..stay tuned for what we have in store.